The application running.
|
| You are looking at Frederik Ramm's "On the Road in North-West Scotland" web experience. It's basically a bunch of photos shot from a moving vehicle, combined with map data. The web interface allows you to see what my camera saw while I was driving. |
| How does it work? |
| Select a route you're interested in, either from the place index with its clickable map, or from the journey table, or from the search results, or from the showcase page. (All of these entry points provide access to the same set of journeys.) You will then be shown a succession of photos taken while driving along that route, together with a map indicating your "current position". Photos are taken every 30-60 seconds on average; depending on the speed I was travelling at when I took the photos, that translates to approximately one photo every 500-1000 metres. If it became too boring, I removed some of the photos later on. |
|
The application running. |
| You can use the "slower" and "faster" buttons in the upper left corner to adjust the playback speed. It is limited only by the speed of your Internet connection. Depending on the image size chosen in the upper right corner, the following are the approximate maximum speeds. (This is really an approximation only; using the CSS or Java modes will improve efficiency a bit - see below.) |
 |
tiny | small | medium | large | |
|---|---|---|---|---|---|
| 28.8 kBps | 3 sec | 5 sec | 8 sec | 20 sec | |
| 57.6 kBps | 2 sec | 3 sec | 5 sec | 12 sec | |
| ISDN | 2 sec | 3 sec | 4 sec | 10 sec | |
| 128kBps+ | 1 sec | 2 sec | 3 sec | 5 sec | |
| Minimum delay between photos, depending on line speed and selected size. | |||||
| If you click on the "pause" button in the upper left corner, the browser will stop loading the next picture automatically and instead wait for you to click on "forward". You will then also be able to switch back to the very first image of the current journey, or go back one step, or jump to the end of the journey. (This is very convenient for "fast forwarding" through a stretch that is of minor interest to you.) |
The application in "pause" mode. |
|
When you reach the end of the journey, you will be presented with a number of
choices - you will usually be able to turn back, make a left or right turn,
or continue along the road you're on.
At any time, clicking on the photo will open up a new browser window with an enlarged version of that photo. Yep, you can read those road signs ;-) |
| Why does the display flicker? |
| By default, the application uses a rather "fail safe" mode in which the whole page is rebuilt every time a new image is loaded. This will work with any browser that supports graphics. If your browser supports frames, then you can try out the frame mode (click on the "Use Frames" link in the lower right corner). |
The mode control buttons. |
| In frame mode, each section of the screen gets its own browser frame which reduces flicker. If frames work, you can go one step further and activate the Java mode. This will download a little applet to your computer and totally eliminate flicker on the map and photo display. |
| What is "CSS positioning"? |
| In the normal (non-Java) modes, the red dot that tells you where you are on the map is generated by downloading a special image file that contains a map segment with a dot painted into it. So for every new dot position, a new image has to be loaded. If your browser supports style sheets (CSS is short for "Cascading Style Sheets"), you can try the "CSS positioning" mode. In this mode, the red dot (more precisely, it is going to be a red arrow) will be downloaded as a separate image and then painted onto the map wherever it is required, thus slightly reducing the amount of data downloaded for every new position. |
| Your headings don't make sense! |
| You may have noted that the application shows the current speed and heading with each photo. In CSS mode, the dot on the map will also be replaced by an arrow that points in the current direction of movement. However, these values are not measured directly, but instead derived from the two GPS waypoints that immediately "surround" the instant when the photo was taken. Since my GPS waypoints may be up to 10 seconds apart and may also sometimes be off by a few metres, there are cases where the derived speed and heading are not accurate. But it works 90% of the time. |
| How did you do it? |
|
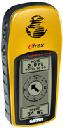
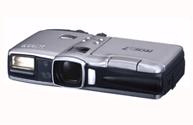
Simple. Take a GPS that records your track (and timestamps the track points), and
take a digital camera with interval mode (automatically shoots a photo every x
seconds). If the camera records the current time with each photo, you can then
write a bit of software to compute the position for each image from the GPS's
track data.
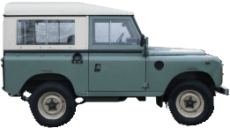
I used the Garmin eTrex, the Ricoh RDC-7, and a 1983 Land Rover 88 Series III Diesel: |
 +
+
 +
+
|
| (Only the first two objects shown to scale) |
|
That way (provided your camera and GPS have enough memory and battery), you can
do all the processing when you're comfortably back home. Another option would
be to use a camera that has a GPS feed (like the scriptable Kodak cameras), or
feed GPS and camera data "live" into a laptop.
You can read more than you probably want to know about this project and the software I've written for it - codename "RoadHog" - on my RoadHog Software page. If you have any further questions, here's how to contact the author. |
| How can I download all the photos? |
| It is possible, but I'd rather encourage you to buy everything from me on a CD-ROM. Here's why, and how. |
| Why are there never any other cars on your photos? |
| They were all queuing behind me ;-) - no, of course I strictly observed the "single track code of conduct", often even on multi-lane roads. There just weren't too many people - that's not a bug, that's a feature of Scotland! (Well, maybe the Food & Mouth crisis kept some tourists away this year, too.) |
| Odds & Ends |
| Map data copyright (c) 2001 Bartholomew (licensed through streetmap.co.uk). No animals were harmed in this production (except perhaps a small number of insects). |
|