(enlarge)
<map> <id>mm</id> <filename>/home/maps/16x83-28x94.gif</filename> <draft-filename>/home/maps/16x83-28x94-draft.gif</draft-filename> <width>6000</width> <height>5500</height> <projection>OSGS</projection> <transform>0.05;0.0;0.0;-0.05;-8000.0;47000.0</transform> <square-width>140</square-width> <square-height>140</square-height> </map> |
This is what my map file looks like. It points to the map GIF (and also to a scaled-down "draft" version that is used for the editor programs to save memory - 6000 by 5500 pixels is not exactly small). Since the "projection" is set to "OSGS" (the British Grid), the RoadHog Software will transform any latitude/longitude data to British Grid data before further calculations are made. British Grid data is basically a reference point (0,0) somewhere in the South-West (the Scilly Islands), and then counting metres north and east from there. The "transform" tag tells RoadHog what to do with the resulting British Grid data; the six values are the parameters for an affine transformation (see java.awt.geom.AffineTransformation), and with the 2nd and 3rd being 0, this is a scaling/translating transformation only. The value 0.05 stems from the fact that my map has one pixel for every 20 metres (1/20 = 0.05). The second 0.05 (for the y axis) is negative since the map pixels count downwards from the upper left corner, while the British Grid counts upwards from the lower left. -8000 and 47000 are the offsets, meaning that my map section starts at 160km east and 940km north.
If you do not use the British Grid, "projection" can also be set to "direct", and in that case, the affine transformation specified by the "transform" tag will be applied to the latitude and longitude directly. A typical "transform" tag for this operation mode would look like so:
<transform>2815.56952215;201.217813365;97.335501285; -5323.4881603;10310.1886127;309492.789808</transform> |
This comes from the "brute-force" way of fitting the GPS track onto the map which I have explained on the co-ordinates page. The code that allows you to find these values graphically is not currently included in the RoadHog software but can be obtained from me if required.
The "square-height" and "square-width" attributes will cause the compiler to split the map into squares (actually, rectangles) of that size. There's also another set of tags that allows you to split the map into rectangles of different sizes. I used that before I had the "one map fits all" approach; I would have one map for each edge and split it so that the parts that would often have to be reloaded because the dot moves over them were smaller than those which were rather constant. In the current RoadHog web experience, there are always 5 by 5 map segments visible, and the display program automatically selects those which lie around the segment that has the dot, i.e. the map section you see moves with the dot. This makes it virtually impossible to use map squares of changing proportions; but in the old version, the map you saw for each journey was constant.
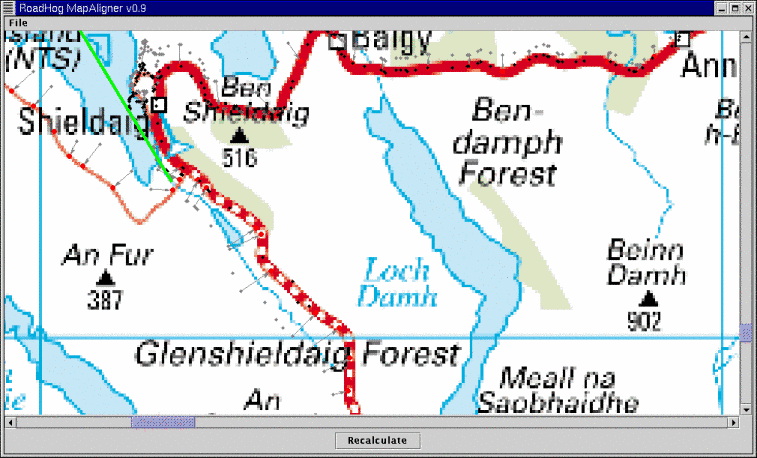
This is what you see when you call the MapAligner. The grey dots are the original GPS measurements, the red dots are those I have left-clicked and then moved to another position, and the black ones are the derived GPS measurements.
java org.remote.roadhog.MapAligner mapfile.xml gpstrack.txt
The green line is a division line; normally, the correction applied to each individual dot depends on its closest neighbours, but the green line cuts through neighbourhood lines (to shield dots on one road from corrections made to those on another road nearby). Division lines are created by left-clicking somewhere and then left-clicking again at the end point of the line.
When you are happy with the position of all the derived GPS measurements, save the map, and the XML file will be augmented by the correction data.
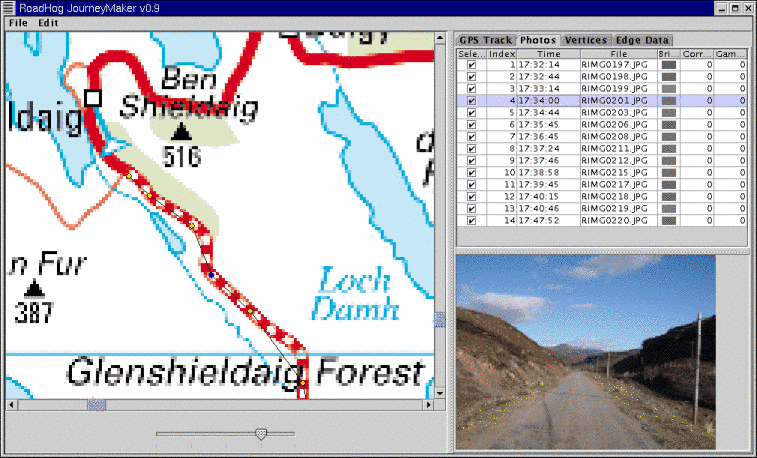
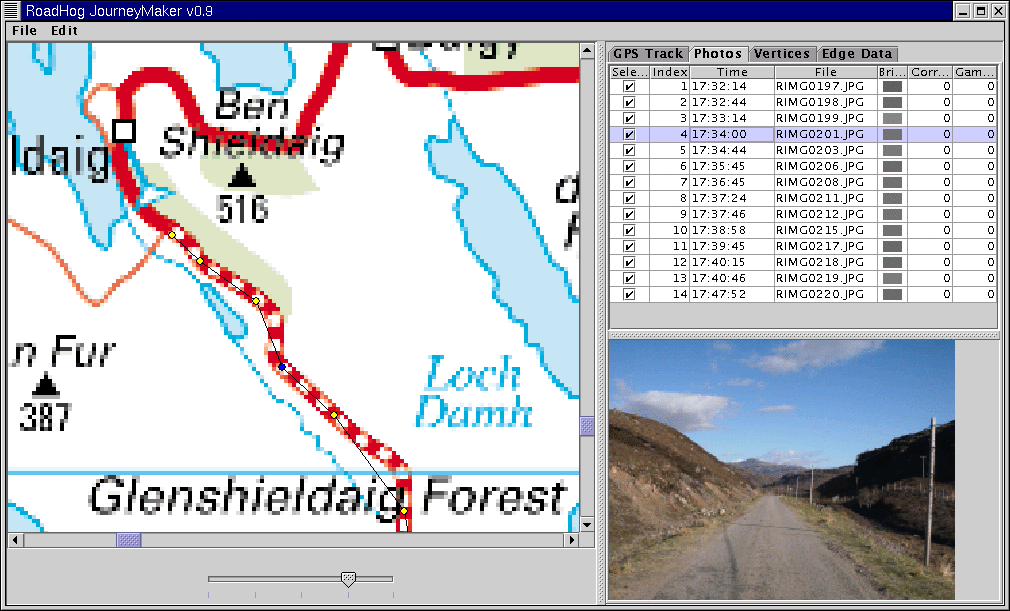
This is the JourneyMaker in action:
java org.remote.roadhog.JourneyMaker -v vertices.xml
   -t gpstrack.txt mapfile.xml
Actually, for this picture I have already loaded a number of photos via the "file" menu (just select them all at once), and set the appropiate "time correction". I do this on a trial-and-error basis; I adjust the time correction until the photo dots are where I believe they should be. Photos can be selected or deselected in the list (or select a number of them and use Ctrl-S and Ctrl-D); this is because you might want to create more than one journey from the same set of photos and the same GPS track. The JourneyMaker shows a thumbnail for each photo (click it for a full-size view) and calculates the average brightness (that's the little grey bar in the list) to help you identify the very bright or very dark ones; you can then add a brightness or gamma correction for those. You can also move the yellow dots representing the photos on the map, as a "last resort" for correcting GPS or map errors. If you're happy with what you see, you can go to the "Edge Data" tab and define from where to where the journey runs, and then save it.
The JourneyMaker can also be called with a journey file among the arguments; in this mode, you do not have to load photos and a GPS track separately because they are taken from the existing journey. Use this mode to edit a journey you have created earlier.
I have written a little program that tells me if my data set looks all right or if there are some anomalies. Here's how it works:
java org.remote.roadhog.Verifier vertices.xml map.xml
  edges.xml journeys/*.xml

vertex 'Toscaig': connector 'Applecross' has no edges
vertex 'Toscaig' is ISOLATED
vertex 'Longman': connector 'Culcabock' has no edges
vertex 'Drumrunie': connector 'Ledmore' has no edges
edge 'achnasheen-kinlochewe' has no journeys in
   Achnasheen->Kinlochewe direction
edge 'applecross-tornapress' has no journeys in
   Applecross->Tornapress direction
Most of these things are things I know - for example, I have entered the vertex "Toscaig" but not defined any edges for it, or I have defined the connector "Culcabock" on the Longman roundabout but not used it for any edges, and so on. But it doesn't hurt to have the computer tell me what it believes is "strange" and then I can judge. The Verifier will also complain if you have two competing edges or if there are multiple journeys on an edge with the same priority values.